Saturday 25 May 2013

Building a Biodome Part 4: Dome Frame and Straw Bale Wall

Building the frame for the dome was one of the more technical parts of the construction process and as I mentioned in the Introduction, I followed the instructions in the Eden Biodome Revolution book.  I'm not going to go into too much detail, because I respect the intellectual property in the book, but if you're interested there is a series of Youtube videos starting with the one below which gives you some insight.


There were 65 struts to cut for a 2V geodome, 35 'A' pieces and 30 'B' pieces - the B struts are longer than the A's.  Given my 16 foot diameter (8 foot height), the A pieces were just over 4 foot long and the B pieces just under 5 foot.  This worked out well for using 10 foot long 2x4's without much wasted wood.  I bought 35 of these, allowing a little bit extra for mistakes. As a novice carpenter I'm proud to say I only screwed one strut up, so anyone can do this with a bit of patience.  Once the pieces were cut to length, the tricky part is cutting the arrowed angle cuts at each end.  For this I borrowed a friend's Bosch dual angle miter saw.  You need a saw that will do a 60 degree cut, preferably on both sides of the saw, but you can make it work if just one side will do this cut.  Cutting the struts took me about 10 hours in total, I took my time over it because it's worth getting the cuts accurate.  It worked for me doing it in two sessions, one for the A's another for the B's.


Once I had them cut I laid out the struts and stained them with a couple of coats of a good quality wood stain.  This will protect the wood from the humidity and UV in the growing space and will ensure maximum longevity for the structure.

The straw bales I sourced from a local feed supply co-operative.  At $5 per bale I ended up paying more than I would have buying direct from a farmer (typically 3-4 bucks per bale), but it was a convenient source not too far out from the city, which when transporting them yourself makes a difference.  It took two trips in a rented pickup truck to transport the 30 bales that I bought.  The second trip I appreciated having a friend along who had grown up on a farm and knew how to stack bales properly - the first trip was a bit fraught, with the tarp and load threatening to fall off at any point.  With the materials assembled it was time to build!


We laid the first layer of bales, then checked them in relation to the base of the dome frame to make sure they were positioned correctly.  I wanted the base of the frame to fit around the edge of the bales, but still be well supported by the wall.  We realized that this was easiest to achieve by actually screwing the base octagon together -playing with it with the pieces separate just made us confused!


Another point of confusion came from measuring across the structure and it not being 16 feet, but just over 15. It was only later that day that I realized this was because we were measuring from the center of the struts, rather than from the corners. Doh!

Once the bale wall was positioned to our satisfaction, we started to stuff all the cracks between the bales.  Aside from aesthetic concerns with holes and cracks, stuffing is important to make sure there are no air pockets in the wall, since these can become points where humidity builds up, can meet with cold air and condense, causing moisture problems.  With stuffing complete, we hammered bamboo stakes through the bales to secure them together to provide a bit of structural integrity.  Then it was time to build the dome frame - this part seemed to be easier to do with just a couple of us doing it, there wasn't a lot of space inside the dome frame and more people would have made it trickier.


The way to construct the frame is to build the triangles of each layer first, then connect them along the top with the cross struts.


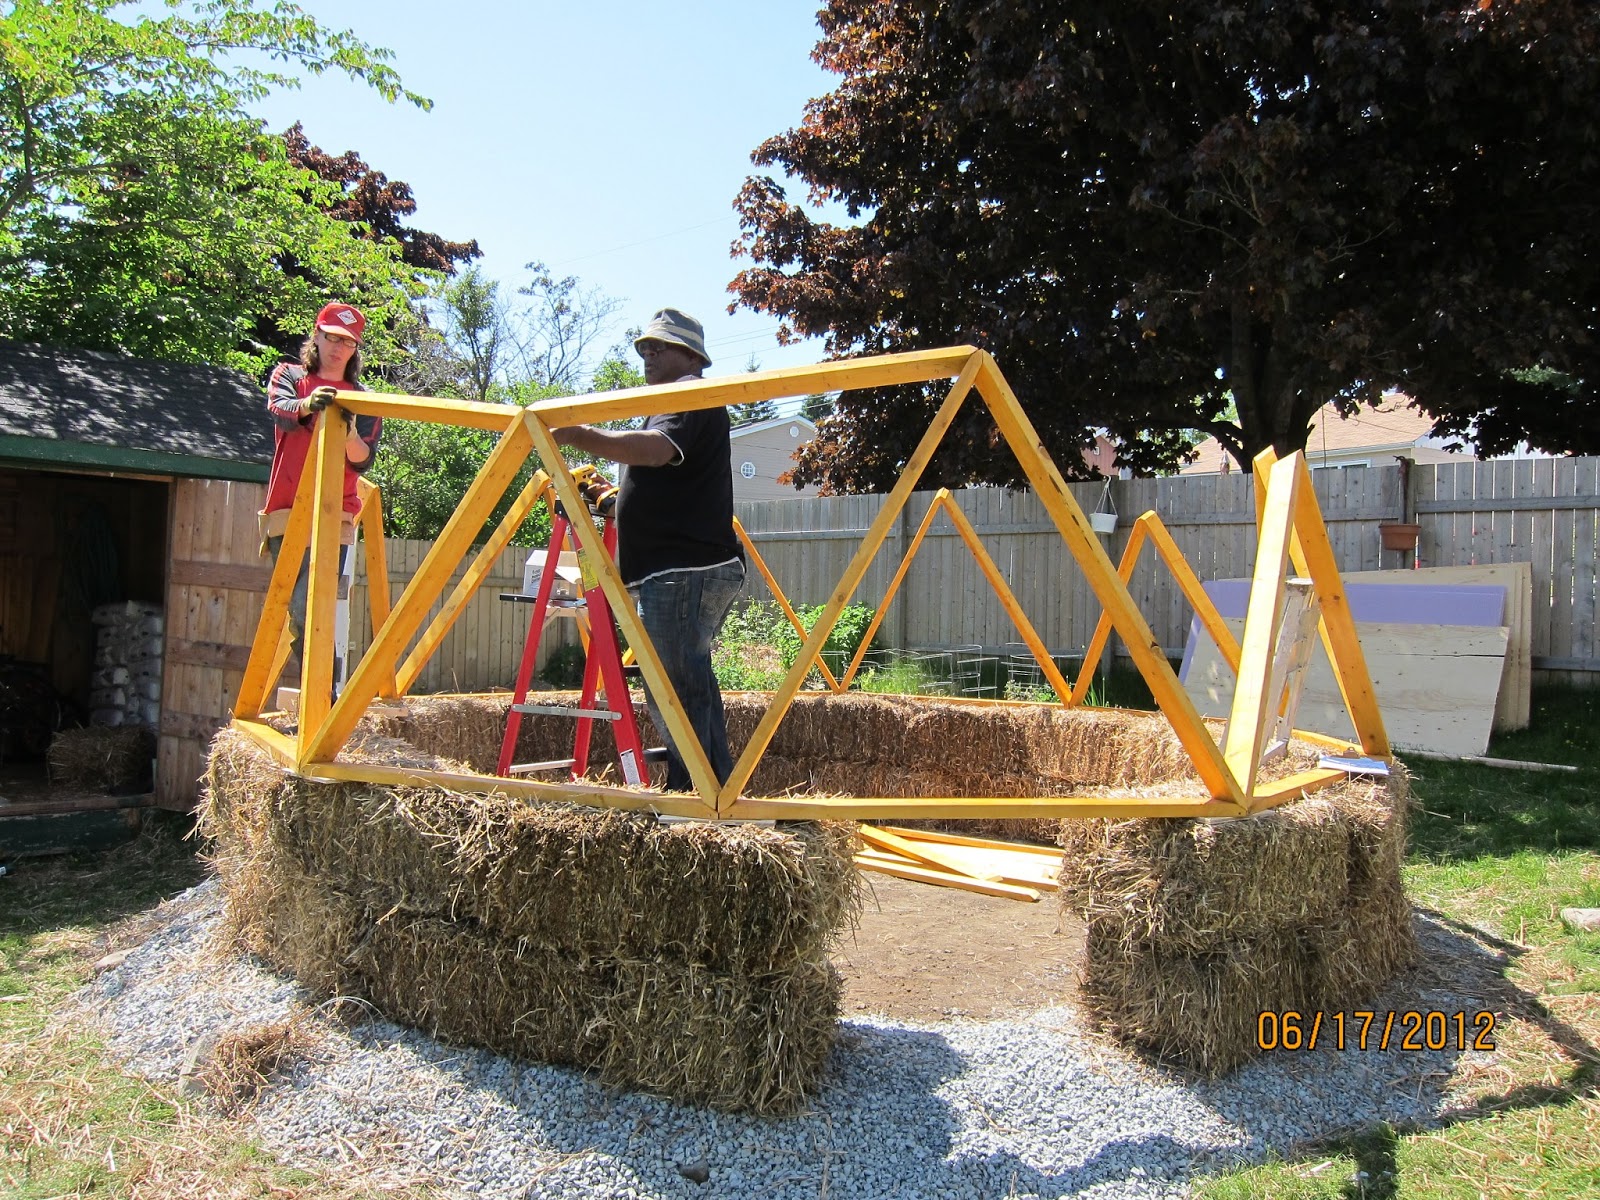
As long as you keep track of whether you need an A or a B piece, the frame construction is fairly straightforward and quite satisfying - you get to see the results of your work quickly.  We used 1 3/4 inch screws to secure the struts to each other.


When we started to do the second layer, it was apparent we needed some support for the triangles before they were fully connected together, so we used a couple of the spare 10x2x4's to do that.


After you get a few of these supports on the go, space to work becomes a bit limited, but it did make sense to keep the structural integrity before the dome could hold itself together.


When we started to work on pieces that were immediately above our heads we felt that hard hats were in order.  A couple of pieces of wood or accidentally falling on our hats thereafter confirmed this was a good idea.


We were amazed when the dome finally came together at the apex.  Not every hub had neatly aligned on the way up, so we were joking about how far off we would be.


We reasoned that getting the base and first row of triangles as close to perfect as possible really effects how things go together further up


Here's the completed frame.  When it was all secured together, it's awesome how strong the structure is.  I hung from one of the struts and felt completely secure.

.

Cost and Effort:

The bale walls and dome frame can easily be built by two people in a day.

Bales: $150
Wood: $150
Stain: $30
Screws: $20
Total: $350

Lessons learned:

Having all the bales and wood struts and a lot of people around in a small yard was pretty chaotic.  This was one case where having less people around to complete the basic structure made it easier.  I wouldn't want to try to do the frame on my own though as I have seen some people do it, two pairs of hands made sense for this part of the job.

Transporting a lot of bales using a pickup is pretty hairy if you don't know what you're doing.  Having a friend that knows how to stack them really helped.

I would take more time selecting the bales myself next time.  I didn't have a choice at the vendor I went to, they just threw down bales to us from the barn.  Good square bales with tightly packed straw and well cut sides make a huge difference to the plastering process, we had too many loose, unruly bales in our collection and some of them were moldy inside which can make the wall unhealthy and structurally weak.

Acknowledgements:

Thanks to Darren, Malte, Julie, Randi, John, Sunni and Avalon for your help with this part of the construction.

Thursday 9 May 2013

Building a Biodome Part 3: Foundation

The first thing I did was mark the central point for the dome structure, which is roughly in the middle of my backyard, which I had observed as being the sunniest spot in the garden.  Once I'd decided on the center of the circle, I pounded in a metal peg and using an 8 ft string marked out the edges of where the foundation trench was going to go with rocks.  I removed all the turf within this circle.


Then I started the laborious job of digging a 2 foot deep ditch that would be slightly wider than my bales all the way around.  I had some help with this from a couple of friends, thankfully.  One of them remarked that digging ditches had to be "the second oldest profession in the world" and it had a ring of truth to it.  No way around it, but this is slow, backbreaking work.  It made me think of my grandfather in the first world war and how hard it was to dig 6-10 foot trenches while battle was raging all around, must have been hellish.


Once the trench was dug I placed 9 concrete blocks at equal distances around the trench.  My 'B' struts that are all along the base of the dome are just shy of 5 ft long, so I made sure the blocks were spaced at that distance.   The base of the dome has ten sides, I didn't place a block where the door was going to be, since I planned to cut that strut out of the structure to make the entrance.  I attached around 6 feet of galvanized wire to each block - the idea being I would use this to tie the wooden dome frame into the foundation and prevent it from blowing off the top of the straw bale walls. Once the concrete blocks and wire were in place we started to move 6 tons of 3/4 inch crushed gravel into the trench.


 This was another laborious job and I was grateful for the help of several friends before it was completed.  The foundation needed this much gravel because the land sloped and the foundation had to be around a foot or so above ground level on one side.  I wanted to get the bales well above ground level to prevent moisture coming in from the sides. We leveled the gravel with two 2x4x10 planks screwed together and a level on top.


Work Effort and Cost

Digging the trench took approximately 2 person days.  Moving the gravel into the trench, around another 3 person days, so 5 person days in all.

6 tons of 3/4 crushed gravel cost $130 delivered.  The galvanized wire cost $20.  I had the concrete blocks lying around my yard, not sure what these would set you back, probably $5 apiece.  I spent a total of $155 on the foundation.

Lessons Learned

While my foundation was cheaper than pouring concrete, I paid for it in work effort.  I planned a biodome construction one day workshop and had intended to get the bale walls and the wooden dome built that day, but we spent the whole day moving gravel after realizing that the foundation as built wasn't high enough.  So I felt bad having friends hauling and leveling gravel that day, which didn't seem very inspiring or interesting.  Construction is kind of humbling that way and will tend to take at least twice to three times as long as an inexperienced person is expecting.  Having said that, spending effort or money on the foundation is never a waste, because the rest of your structure will be more 'true' if it is deep and level.

Talking to straw bale construction experts later in the build, they were very concerned about placing bales directly on the gravel foundation.  They thought that the bale walls would wick water up from the dew point and eventually rot as a result.  Their recommendation would be to put a layer of flat rocks, then a layer of earth bags all around to raise the bale wall higher off the ground and create a moisture barrier.  I would go with this recommendation if I were doing this again.

Acknowledgments

Thanks to James, Malte, Julie, Sunni, Jim, Randi and John for your help with the foundation!

Tuesday 23 April 2013

Building a Biodome Part 2: Design

In part one I went over some of the goals and ideas that informed my biodome design, namely:
  • Maximizing passive solar gain and insulation to lengthen the growing season;
  • Creation of a 'living' structure that adapts with the climatic conditions;
  • Maximization of the amount of plant growing space;
  • Ensuring the end result is aesthetically pleasing; and
  • Using sustainable, environmentally friendly materials where feasible.
With these design goals in mind, I will go over the architecture I came up with and explain the choice of materials and construction approach.  At this point I will not be providing an opinion on whether the design choices were good ideas or not; in later posts I will go over each part of the structure in the order in which I built it and explain any challenges I faced when theory hit reality.

When considering dome construction, you can get as large or as complex as you want, with many options of geometric shapes.  Dome families include icosahedrons, cubes, octahedrons or the wonderfully named rhombicuboctahedrons.  Looking around at these, I realized that I recognized the shape of the icosohedrons best and it seems that there is more practical construction information available about them online than any of the other polyhedrons.  Beyond their geometric family, geodesic domes are defined by the different lengths of the struts that form the structure.  If all the struts are the same length, that is known as a 1V dome, two different lengths of struts form the 2V dome and so on.  You can get an idea of what each icosahedron dome looks like on the Desert Domes site by mousing over the 1V-5V links here.  The more different strut lengths you have, the harder your design is going to be to build, also the 3V-5V shapes are more suited to larger structures and the 1V-2V more practical for a smaller building.  I opted for a 2V dome, since these are recommended for up to 15 foot diameter and the space I had in my garden was around that size. 

The simpler geodesic domes by themselves aren't the greatest for usable space, as the sides of them slant in a fair bit making that side area harder to use.  Consider this 5 meter (16 foot) diameter 2V dome, with an averaged sized human standing in it:


As you can see while the person can walk around the center of the space it would be harder to work around the sides, with the need to bend over causing the space to be less functional.  So I figured the design should include a wall that acts as a base, raising the dome to around hip height and increasing the amount of usable space and  headroom. 

My choice for the base wall was informed by a passion for straw bale building that I've had for many years. Straw bale construction has very high insulating properties, having an R value of between 30 and 45.


When you apply a natural hydraulic lime plaster finish the wall has the capability to allow air and water vapor to pass through it, ensuring air exchange for the growing environment even when the windows are closed in winter.  The lime plaster also adds  thermal mass to the construction which will help to keep the structure warm at night.


Straw bale structures have very rustic, earthy aesthetics and the idea of the straight lines of a geometric dome contrasting with a very organically shaped circular wall was appealing.

Straw bale buildings come in two main building styles, load bearing and non-load bearing.  In load bearing, the straw bales are what holds up the roof.


In non-load bearing, a post and beam structure is used to hold up the roof, with the bales filling in the walls:


I opted to go with the load bearing approach, since it would use less material (no need for wooden posts and beams) and should also be quicker to construct.

For the foundation of the bale wall I considered pouring a concrete slab, but thought that would add expense that I would rather spend elsewhere in the structure, also I wanted to avoid concrete because its production is very energy intensive and environmentally unfriendly.  So I considered the simplest foundation I could and figured that a trench that was slightly wider than my straw bales filled with 3/4 inch gravel would work OK.  The idea being that any water would drain downwards into the gravel.  I also devised a way to anchor the dome structure to the bale wall, by placing cement blocks in the gravel trench and attaching the base of the dome to the blocks in the foundation with galvanized wire.

When I was first considering the material for the dome struts, I was finding a lot of how-to's by Burning Man festival regulars who were using electrical conduit (metal tubing).  Geo-domes are everywhere on the Playa acting as temporary shelters and hangout spaces for attendees.


I liked the possibility of using metal tubing since it seemed straightforward enough.  Cut your strut lengths to the correct sizes, then flatten, drill through and bend the ends of the struts so that you can bolt them together like so:


The more I thought about this though, this wasn't as easy as it seemed.  You need quite a strong press to crimp and bend the ends of the conduit and I read stories of people busting their tools as they produced the 65 struts needed to make a 2V dome.  Also it wasn't clear in my mind how I would attach a clear membrane to this structure or easily add insulation to the north side of the space.  Metal conduit works fine for a temporary shelter you can erect at a festival and cover with tarps, but I needed something more permanent and practical for making a greenhouse.  I knew it wasn't going to be easy, but I came to the conclusion that wooden struts was the way to go.

When using wooden struts to build a dome you can either go with connectors at the junctions of the struts, or you can cut the wood with a slanted arrow shape at each end and screw it together.  


As I was looking into this, I came across Kacper Postawski's book "The Eden Biodome Revolution".  The book lays out how to cut the angles of the wood for the arrowed struts in a level of detail that I couldn't find anywhere else.  While I thought the book was overpriced at $50, I don't think that I would have been able to figure out how to cut the wood without it.  The book also sang the praises of a material called Polykeder, which I incorporated into my design as the transparent covering for the dome.  Here's some information from Polykeder.com:

"PolyKeder is the name of an air bubble greenhouse film designed for long term, outdoor exposure to the elements and designed specifically for plant production.  PolyKeder is waterproof, airtight, strong, lightweight and flexible enough to be cut with scissors, can be recycled or safely incinerated, can hold the weight of three men, and can be adjusted to virtually any structure.  With careful installation, one layer of PolyKeder can last over 25 years!  PolyKeder guarantees an even light diffusion over the entirety of the structure."


"PolyKeder uniquely allows a substantial amount of sunlight, approximately 83%, 30% of which is healthy infrared light, diffusing through more than 100 air burls per square foot.  The diffused light scatters evenly so as to avoid and eliminate the common difficulties of both shading and burning areas within the structure. Another important point about diffusion is that in the winter months the sun is low in the sky and plants don't respond well to that.  Diffusion tricks the plant because light hits it at all angles, not just from the side. PolyKeder provides an insulating effect that retains up to 95% of heat radiation while providing its users with impressive R and U Values and unprecedented thermal resistivity and conductivity creating the most energy efficient product available in a single layer film without any further enhancements. The R value of Polykeder is 1.7"

I was happy to find this material and it seemed perfectly suited to the job at hand, appearing flexible and straightforward to cut into the triangles to cover the dome.  I figured it was far simpler than trying to fashion custom polycarbonate triangles, which would be the only other way to get the diffusion and insulation properties that are required to meet the design goals.  

By covering the majority of the dome in this watertight plastic material and considering the amount of heat that will build up inside the dome in the sun, it was clear that ventilation was going to be important .  For that I figured windows in the upper part of the structure where it's warmest would be good. Kacper's book turned me on to the idea of self-opening windows that activate with heat and I found these beauties at my local Lee Valley Store:


I was excited about these too, because they are another way in which the biodome acts like an organic system and adapts automatically to its climate.  They are a great example of bio-mimicry,  making me think of flowers and plants that open up during the day and close at night. 

The final piece of my design was to figure out how I was to insulate and cover the north side of the dome, the part that doesn't receive direct sunlight.  I decided to go relatively conventional with this side of the dome with 3/4 inch plywood on the outside, rigid pink foam insulation in the cavity and Reflectix on the inside, creating a kind of reflective mirror to focus the sun's rays into the water tank's thermal mass.

With all these decisions made I was ready to get out of planning mode and into building this thing.  I started sourcing and ordering materials and began preparing the foundation, which I will talk about in Part 3.

Sunday 14 April 2013

Building a Biodome Part 1: Introduction

I've been a gardener for around 6 years and while I get great satisfaction out of it as a therapeutic activity that connects me with nature, I've been progressively disappointed with the yields my garden has been producing.  Even with raised beds, good soil and care and attention it always seems like I've put more energy in than I have got back.  Living in a northern climate in Nova Scotia, Canada we don't have the longest growing season with frosts possible well into June and starting again around mid-October.  We can have weeks on end of rain, high winds, droughts and unpredictable cold snaps, all of which stunt the growth of plants and diminish the harvest.  After a few years of this I became convinced that I needed a greenhouse so that I could address some of these problems. 

I looked around at greenhouse kits online and most of the conventional ones didn't appeal.  I was surprised to find that even a  very basic 6'x8' aluminum framed conventional greenhouse kit will set you back around $3000, such as the one pictured below from Backyard Greenhouses.

Click 'BuyNow' for purchase..

On looking a bit deeper at this model, I figured that to extend the growing season where I live beyond a couple of weeks one of these probably wouldn't cut it.  For one thing, the insulating effect of the 6mm double-pane polycarbonate covering has an R value of 1.54,  which while not bad, is still at the lower end of the possible options. Selecting a good cover is one the most important considerations when buying or designing a greenhouse as articulated very effectively in this article in GreenhouseCatalog. In a colder climate every bit of insulation counts as protection for your plants. Here's a table from that page, which is a handy reference.


Greenhouse Covering R-Value U-Value
5mm Solexx Panels 2.30 0.43
3.5mm Solexx Panels 2.10 0.48
8mm Triple Wall Polycarbonate 2.00 0.50
Double Pane Storm Windows 2.00 0.50
10mm Double Wall Polycarbonate 1.89 0.53
8mm Double Wall Polycarbonate 1.60 0.63
6mm Double Wall Polycarbonate 1.54 0.65
4mm Double Wall Polycarbonate 1.43 0.70
Single Pane Glass, 3mm 0.95 1.05
Poly Film 0.83 1.20


The second problem with the conventional kit was that it was too small.  I'd need a good amount of space inside, since I'd have to sacrifice some of the growing space to thermal mass.  If you want to keep the plants warm at night, it's not enough just to have warm air in the space, since that will cool as soon as the sun goes down. Thermal mass is a repository for the sun's energy that is an important element of passive solar heating.  Typically in houses it is a mass of stone or brick, but water is also a very effective medium to collect heat during the day and slowly give off that warmth at night and that is normally the choice for greenhouses. There's a great article about building a solar greenhouse here that gets into some of the facts and figures such as how much water you need versus the dimensions of the space.

Another thing about the rectanglar design of the conventional greenhouse is that it may not be the best shape to withstand the high winds I get in my region.  I've seen the straight lines of my backyard fence heave in heavy storms and I had to replace it entirely when Hurrican Juan whipped through our area.  You can get rectangular greenhouses with curved roofs which seems better, but still I'm not convinced it is the best shape for aerodynamics and longevity in an area that gets regularly whipped with Nor'Easter's.

Finally I don't find conventional boxy architecture aesthetically pleasing or mentally, emotionally or spiritually satisfying to be in.  I'm a great believer in the idea that architecture shapes our consciousness and that the built environment can restrict or liberate our lived experience.  Many traditional dwellings are circular, from the tipis of the Native Americans to the yurts of Mongolian herders to the thatched mud huts of the Masai in Kenya.  I think there is a good reason for this. Circles are everywhere in nature, from water droplets to stems and branches, the shape of the Earth and even in our very cells; try finding a rectangle anywhere in the natural world!  In the words of Oglala Sioux medicine man Black Elk "There is no power in a square house".

After going off the concept of a conventional greenhouse, I recalled the concept of the biodome. I had seen them used before at the excellent Eden Project in southwestern England.  Based on the classic Buckminster-Fuller dome geometry, these unique spaces take greenhouses to the next level, becoming more like mini-climates, where every element of the structural design is a conscious part of a living system.


What I didn't realize is there is recent movement of people making them for their own gardens, which I started to uncover in my travels around the internet.  Following dome links I found the excellent designs produced by Growing Spaces and it all seemed to fall into place - yes, this is what I was looking for. 


The shear and deflection inherent in a dome fares better than a square shape does in high winds, pushing the structure down, rather than over.  The dome shape is an approximation of a more natural spherical form, providing an element of bio-mimicry and a more natural shape to capture the sun's rays as it travels across the sky.  The north interior side of the Growing Spaces domes are insulated and a reflective material added to focus the sun's rays onto a large water tank at the back of the dome.


The thermal mass of the water retains heat and solves the problem of cold nights, allowing for the possibility of radically extending the growing season, not just for a few weeks but for months.  Stories of people harvesting lettuce in cold climates in March warmed my heart, as did those of dome owners being able to keep tropical plants alive through the winter.  Then I looked at the prices of the kits and even for the smallest 15' dome it was in the region of $7,000 just for kit and additional materials would still be required.  Being someone that likes a challenge I thought I could do just as well, if not better with my own design, admittedly borrowing most of the ideas from the Growing Spaces concept.  I set my budget to half of buying a kit, thinking that $3500 would be more than generous for what I had in mind, then I set to work on my own design, which I will detail in part 2 of this series.